Alight Motion has many advanced features to help you enhance your videos in different ways. Camera Objects are one such item which acts like a layer. It helps you choose the exact part of your composition which you want to render.

There are a few things which you can do with camera objects:
- Add depth to the visual, blur or focus, and fog.
- Use keyframes to change object sizes and positions and animate them creating new dynamic scenes.
- Add multiple camera objects to the same projects and separate them.
- Creating overlays by parent layers
- Tracking motions by parent cameras on other layers
- Simulate realistic motion by adding new motion effects.
Adding a Camera Object
First open Alight Motion on your iPhone or Android device and tap on the “Add layer” option.
Next, you should select the Object tab and tap on the Camera icon there.
In order to see exactly what the camera object is about to do, you should have more layers on your projects.
At first, you will see the default wireframe view of the camera. Even when you start motion of the video, it is still the wireframe visual that you can view in camera position.
You switch on and switch off the active camera mode while you edit.
Now tap on the “Active Camera View” button to see through the camera. You can find this on the “View Options” panel of both the Android and iPhone devices. You can move the position of the camera and check the preview of the project this way.
As you work on the project, you can simply press on the Active Camera View option on and off to switch between modes. This will help you preview the progress of the project and give you a clearer idea of what you are doing.
Z-Axis
Z-Axis can help you form 3D images. It lays along your forward and backwards movements of the camera lens, thus creating different layers. You can form keyframe animations this way that shows the depth of the visual.
Zoom Distance and View Angle

Both the zoom distance and the view angles are important factors of your visual.
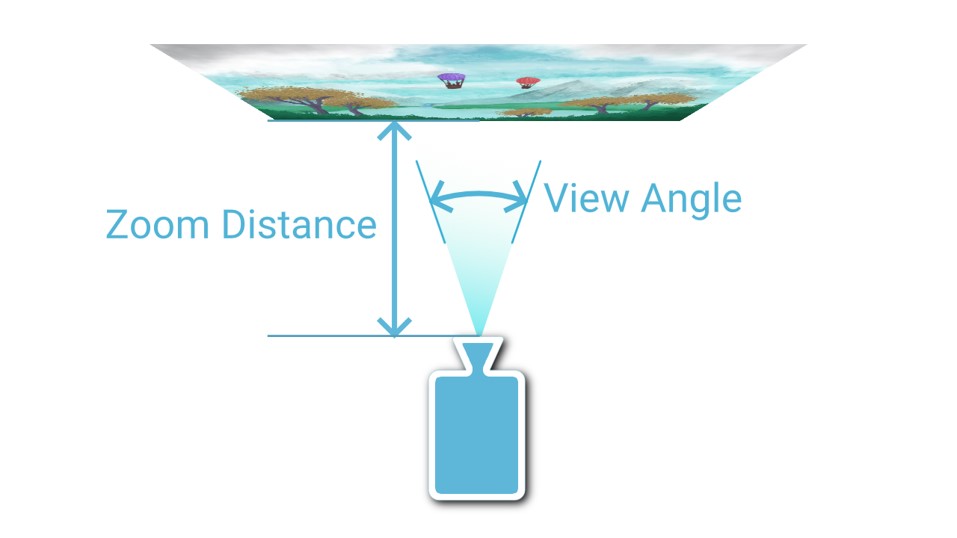
Zoom distance can be described as the distance at which the visual fills the project size. Zooming in means that this distance increases.
View angle can also be called the projection angle. It is the number of degrees which the longer dimension of your project size covers.
With these two, you should be able to understand that when an object is zoomed in, its view angle reduces. Hence, the camera wireframe, which shows the Z=0 plane, will appear to decrease too.
Scale
Scale is another way which you can use to adjust the zoom distance and view angle. It can be found in “Move and Transform”. You can enter the scale you want the object in.
When you enter numbers as the scale, those will define the width and the height of the camera wireframe. The existing zoom distance and view angle determine the existing size of the project at Z=0 plane.
However, the effects you apply to a normal layer will not make any change to the camera layers. And, the parent layers cannot affect the cameras with parent connections.
Focus Blur
You can use this tool to blur certain objects and let the important parts remain focused. There are 3 factors that you can use to adjust focus blur:
- Focus distance – This is the distance you focus the camera along the Z-axis.
- Depth of field – the range circling the focus distance which you focus on.
- Blur strength – the magnitude or the degree of blurring you use.
The focus distance, depth of field and blur strength can all be changed by the position you place the camera at. The layers to certain layers also change by the same, thus giving you a different focus blur at different points.
Fog
You can enable and disable fog effects on the camera. It is seen as a mist or a translucent cloud over the layers of your project. However, you can control the settings of fog and adjust its characteristics:
- Color – you can change the color of the fog from fog settings
- Near distance – You can place the fog on layers further from the camera while the ones closer to the camera remain uncovered. This will make the objects closer to the camera clear and the rest fogged.
- Far Distance – This is the far distant limit of the fog. Fog can be placed in different distances and various boundaries and you can set an end to it. So you can place it on objects which are far away from the camera.
Both the near distance and far distance can be determined by the camera position, again. So when you move the camera forward or backward, the layers you applied the fog can change in turn.
Active Camera, Default Camera and Multiple Cameras
You have the option of multiple cameras and get different angles of view. The Active camera is on the object with the highest timeline and Default camera is the object with the lowest timeline.
You can turn cameras on and off when rendering a view. The default camera will be active when there are no other cameras active.
Parenting with Cameras
If you parent a layer, it will follow the camera’s movements. When both the camera and the layers are in motion, you will find this option very useful. It will automatically flow in a realistic manner, creating quality videos.
Another instance you can use this is for text such as captions and subtitles to be displayed while the videos are played. So, parenting a camera will let the layers follow its movement.
Adding Effects to Cameras
You can add certain effects to the cameras of a project to get different visuals. These may be added to the layers or specific objects alternatively creating diverse patterns.
- Motion Blur – Applied to layers based on the layer movements as well as those of the camera.
- Auto-Shake – To act as transformation effects.
- Oscillate – to change camera position and simulate movement in a more realistic way.
If you take a look at the Effect Browser, you will find more such effects which you can apply to the Camera objects.
Final Words
Camera Objects are crucial for the enhancement techniques you can use in Alight Motion. If you explore the app more and get used to them, you can improve the quality of your projects even further. This could be an interesting area for the beginners as well as the experts. And altering the characteristics of the Camera objects is not available in other similar applications.
Therefore, if you are using Alight Motion, you definitely can try to work with camera objects to get a better outcome.